Recording Shiny demos frame by frame
The short videos at the top of my package posts look like screen recordings. They are not. Each frame is drawn from a clock, so every run gives the same video, and a change of colour or font takes one command.
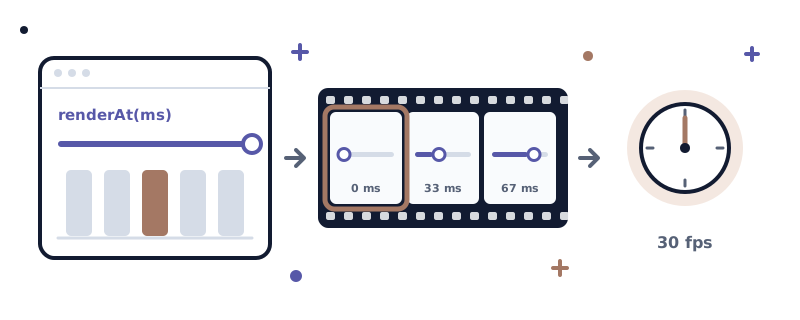
Each of my package posts has a short video near the top. A pointer drags a slider, a menu opens, a caption explains the step. It looks like a screen recording.
It is not one. Nothing in the video was filmed. A script asks a web page for its state at 0 ms, then at 33 ms, then at 67 ms, and takes a picture each time. ffmpeg joins the pictures into a video.
This post is about how that works, and why I did it this way.
Why not a screen recording
A screen recording records what happened. I wanted to describe what should happen, and then draw it.
A recording has three problems for a demo that I want to keep:
- It is never the same twice. The pointer moves at a slightly different speed. A plot takes a little longer to draw. If I record again next month, the video changes in ways I did not ask for.
- It needs the real app running. The apps are R. To record them, I need R, the packages, the data, and a window of the right size, all at once.
- A small change means a new take. If I change the blog’s font, every video still shows the old one. With a recording, the only fix is to record again by hand.
The app in the video above is a few lines of R:
library(shiny)
library(rewind)

ui <- fluidPage(
  rewind_buttons(),
  selectInput("region", "Region", c("North", "South", "East", "West")),
  sliderInput("year", "Year", 2018, 2026, 2024),
  plotOutput("plot")
)

server <- function(input, output, session) {
  rewind_enable()

  output$plot <- renderPlot(plot_for(input$region, input$year))
}
The video does not run this app. It shows a page that looks like it, and that page is a function of time.
A scene is a function of time
Each video has one HTML page, which I call a scene. The scene defines one function, window.renderAt(ms). It puts the page in the state that it has at that moment, and it does nothing else. It does not start a timer, and it does not wait for anything.
This is the key rule. If the page depends only on ms, then frame 120 is the same picture on every run. The recorder can ask for the frames in any order, as fast or as slow as it likes.
A scene describes its story as a timeline. Here is part of the rewind scene, a little simplified:
window.renderAt = function (ms) {
  // The drag runs from 1200 to 2200 ms. The region changes at 3650 ms.
  // Ctrl+Z at 4750 ms puts it back.
  const dragX = track(ms, [[1200, xOf(2024)], [2200, xOf(2020)]]);
  let year = ms < 1200 ? 2024 : yearAt(dragX);
  let region = ms >= 3650 ? "East" : "North";
  if (ms >= 4750) region = "North";

  // The position in the history, as a list of steps.
  const index = stepAt(ms, [[0, 0], [2600, 1], [4100, 2], [4750, 1]]);
  document.querySelector(".rewind-undo").disabled = index === 0;

  setCaption(ms, [
    [900, 2900, "One drag is one step"],
    [2950, 4350, "Changing Region is another step"],
    [4450, 5700, "Ctrl+Z steps back: Region is North again"],
  ]);
  setVeil(ms, DURATION);
};
Every value on the page is computed from ms. Nothing remembers the last frame.
Small helpers for time
A few small functions do most of the work. They all take the time first.
// A value that goes from a to b between t0 and t1, with easing.
const tween = (ms, t0, t1, a, b) =>
  lerp(a, b, ease(clamp((ms - t0) / (t1 - t0))));

// The value of a list of [time, value] keys at a time: eased between keys.
function track(ms, keys) {
  if (ms <= keys[0][0]) return keys[0][1];
  for (let i = 1; i < keys.length; i++) {
    if (ms <= keys[i][0]) {
      return tween(ms, keys[i - 1][0], keys[i][0], keys[i - 1][1], keys[i][1]);
    }
  }
  return keys[keys.length - 1][1];
}

// The state of a list of steps, [time, value], at a time:
// the last step that has started.
function stepAt(ms, steps) {
  let value = steps[0][1];
  for (const [t, v] of steps) if (ms >= t) value = v;
  return value;
}
track() is for things that glide: the pointer, a slider handle. stepAt() is for things that jump: a menu that is open or closed, the position in the undo history. With these two, a scene reads like a script for a film: at this time, this happens.
The parts that are not the app are drawn the same way. The pointer follows a list of [time, x, y] keys and makes a ripple at each click time. The caption is a pill that fades in and out between two times. The keys of a shortcut, such as Ctrl and Z, appear in the corner and press down at their time.
One more piece makes the video loop well. A white sheet covers the scene in the first 350 ms and fades in again in the last 450 ms. The last frame and the first frame are then both white, so the loop has no jump.
Things that move on their own
The rule “the page depends only on ms” is easy to break by accident. Three things can break it.
CSS transitions. A transition runs in real time, between two frames that the recorder takes. The shared stylesheet turns them all off:
*, *::before, *::after {
  transition: none !important;
}
CSS animations. The bones skeleton has a wave that moves across the grey bars. It is a CSS animation, and it belongs in the video. So the scene does not turn it off. It sets its time instead:
// Set the time of every running animation, and hold it there.
function freezeAnimations(ms) {
  for (const a of document.getAnimations()) {
    a.pause();
    a.currentTime = ms;
  }
}
document.getAnimations() returns every animation on the page. Each one is paused and moved to the time of the frame. The wave is then exactly where it should be at that moment.
This matters for the bones scene in another way. Its markup and its CSS classes are the ones that withBones() writes, and its stylesheet is the real bones.css from the package:
ui <- fluidPage(
  withBones(plotOutput("chart")),
  withBones(tableOutput("results"), rows = 8)
)
So the skeleton in the video is drawn by the package, not copied by hand. Only the clock is new: renderAt(ms) sets the classes that the package’s JavaScript would set at that time.
Fonts. If the first frames are taken before the web font has loaded, they show a fallback font, and the text jumps a few frames in. The recorder waits for every weight of the font before it takes the first picture.
The recorder
The recorder is a Node script of about 100 lines. It uses Playwright to open the scene in Chromium, and ffmpeg to make the video.
The page is 640 by 360 pixels, at a device scale of 2. The pictures are then 1280 by 720, and the text is sharp. The script steps the clock 30 times a second and pipes each picture straight into ffmpeg:
const frames = Math.round((duration / 1000) * FPS);
for (let i = 0; i < frames; i++) {
  await page.evaluate((ms) => window.renderAt(ms), (i * 1000) / FPS);
  const png = await page.screenshot({ type: "png" });
  if (!encoder.stdin.write(png)) {
    await new Promise((r) => encoder.stdin.once("drain", r));
  }
}
ffmpeg reads the PNGs from its input and writes an H.264 file:
ffmpeg -f image2pipe -framerate 30 -i - \
  -c:v libx264 -preset slow -crf 21 -tune animation \
  -pix_fmt yuv420p -movflags +faststart -an preview.mp4
-tune animation suits pictures with large flat areas, which is what a user interface is. -movflags +faststart puts the index at the front of the file, so the browser can start to play it before the whole file has arrived. -an means no sound.
Last, the script calls renderAt() once more, at a time that the scene chooses, and saves that picture as a JPEG. That is the poster: the image that shows before the video plays. Each scene picks a moment that explains itself. For rewind, it is the moment of Ctrl+Z, with both buttons in use.
What it gives me
A video of 9 seconds is 270 frames. Each of my three videos is between 140 KB and 210 KB, smaller than most photos on a phone.
The best part came a few days ago. I changed the colours and the font of this blog. The videos had the old caption colour and the old font. I changed two stylesheets and ran one command. All three videos and their posters were recorded again in under a minute, and nothing else in them changed.
On the page, the video is muted and loops, and it plays by itself where the browser allows it. A reader who asks for less motion gets the poster and the play button instead. In the RSS feed, which other sites such as R-bloggers copy, there is no video at all: the feed shows the poster, with a link to the post.
The limits
This is not the right tool for every demo.
- It is a recreation. The video shows how the package behaves, not the R code running. If the package changes, the scene does not change with it. I have to keep them in step by hand.
- A scene takes time to write. The rewind scene is a few hundred lines of HTML and JavaScript. A screen recording takes a minute.
- It cannot show real speed. A demo of how fast something is needs the real thing. Here, the scene decides how long everything takes.
If you want the real app on screen, shinytest2 can drive it and take screenshots of it. Then the timing belongs to the app, not to a clock. For a demo that I want to keep, change and record again, the clock wins.
Try it
The scenes and the recorder are in the repository of this blog, in the _previews folder. You need Node, Playwright with Chromium, and ffmpeg. Then:
node _previews/record.mjs          # all scenes
node _previews/record.mjs bones    # one scene
If you make a demo this way, I would like to see it.